Statement of intent
I have been exposed to games from a really young age. They all played an important role in developing my personality, in making me the person I am today.
One of the games that impacted me the most was Undertale, made by Toby Fox. The story and the world of the game intrigued me like few games could at that time. I soon came to realize what the characters meant for me and how the game became like a safe space for me. It made me realize I wanted to make others feel the same way as that game made me feel.
I decided to take this course because I felt positive it would help me achieve my professional goals. I want to improve my character designing skills, my storyboarding and storytelling skills and other sets of skills that are necessary for game designers.
Once I finish this course, I want to be able to design games, but especially characters, that speak to the audience.
Dave Filoni research
David Filoni, also known as Dave Filoni, is an American animation director, designer, voice actor, television writer, television producer and animator. He is most known for his work on Avatar: The Last Airbender, The Mandalorian and on the theatrical film and television series of Star Wars: The Clone Wars. He was also the creator and an executive producer on Star Wars Rebels for all four seasons, and served as its supervising director for all but the third season, in which Justin Ridge served as supervising director while Filoni accepted a promotion to oversee all of Lucasfilm Animation projects, including the games Star Wars Jedi: Fallen Order and Star Wars: Squadrons, made in collaboration with EA. Filoni is also credited as one of the writer and executive producers of the web series, Star Wars Forces of Destiny and as the creator of the 2018–2020 animated series, Star Wars Resistance. (Wikipedia)
His work has been inspiring me tremendously recently. I find each of his character designs unique and intricate. One example of him making characters stand out was his portrayal of the clones. Each clone has a different haircut, armor design, tattoo, and along with the voice actor and the animators, Dave Filoni gave each clone their own identity, thus making them stand out from each other even if they all share the same face and voice. I find his characters really colorful, but somehow still balanced. Those are skills not many can master and I hope that after finishing this course I’ll be able to do the same.
Something else that I look up to is his ability to tell stories through his designs and illustrations. Below are some examples that I believe could tell never-heard before stories.


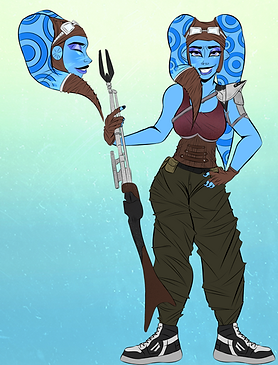
His work has inspired me so much I decided to create a Star Wars character of my own.


Forced perspective
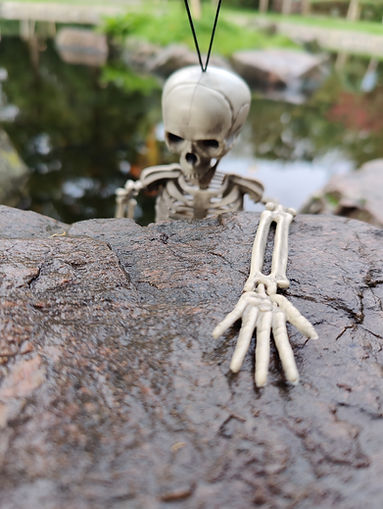
On our first week of studying, we were tasked to created forced perspective photos as a way to experiment with imagery. I used this mermaid skeleton toy as my principal subject and placed it in different environments. I then edited the photos in Photoshop, aiming to express the atmosphere of these shots better, but also to remove the toy's string. I changed the hue, saturation and exposure of the original shots, added aditional tree branches, fog and lens flares to imitate light effects used in movies.
First you will see the edited pictures, then the original ones.
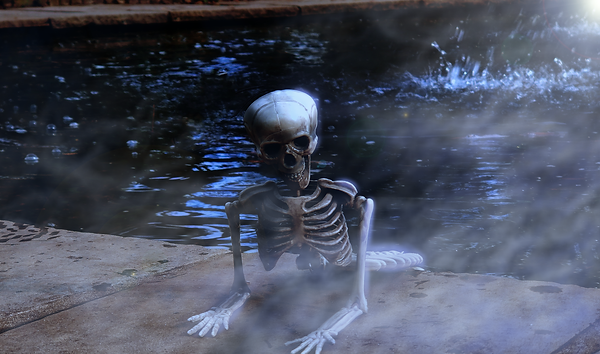

All photos have been taken using my phone's camera, at the Kyoto Garden in Holland Park.


Character sheet

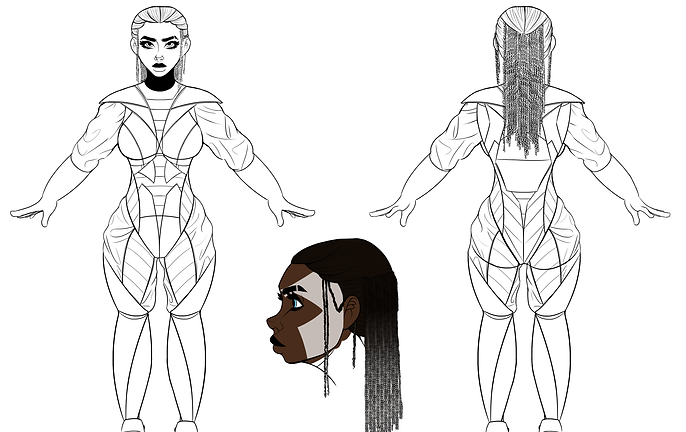


This character went through some changes from the first sketch (the traditional one) to the final product. At first I wanted her to have some sorts of facial paintings or tattoos and even a belt, but I decided to drop these 2 ideas, as I didn't find them fitting anymore.
1 point perspective

The 1 point perspective contains only 1 vanishing point, located directly in front of the viewer's eyes, on the horizon line, also known as 'eye level'.
Above you can see a step-by-step tutorial on how to use the 1 point perspective, and a demonstration of how it can affect characters (notice how the character gets smaller and smaller, the closer it is to the vanishing point).

Notice how if the character is placed above the horizon line, it seems like we're looking up and if the character is placed below the horizon line, it seems like we're looking down, which can be applied to all types of perspective.
2 point perspective
The 2 point perspective is achieved by having 2 vanishing points on the horizon line. Below you have a step-by-step tutorial on how to draw using the 2 point perspective.

3 point perspective
This type of perspective is achieved by using 3 vanishing points. 2 of them are placed on the horizon line, while the 3rd can be placed either above, or below the horizon line. The closer the vanishing points are to the horizon line, the more of a 'bird's eye' effect you will get.

Name in perspective

After getting accustomed to using perspective, we've been asked to draw our names in perspective. I chose to draw mine using the 2 point perspective. In order to draw my name properly, I had to create a reference point at the bottom of the page, helping me 'squish' the letters properly as they get closer to the vanishing point.
Character in box

Another exercise was to draw a character inside of a box, using perspective.
Turn-arounds

As we were developing our characters, we've been asked to sketch some turn-arounds.
Skull

Environment

This is a temple I have drawn using charcoals and a red posca pen.
Vehicle

For this task, I have decided to design a spaceship based on a random object I found on my desk.

Asset
The asset I've designed for my child's dream game is this artifact, found inside of the temple I've presented.

One line self-portrait

This was meant to be a warm-up before class. The challenge was to draw without taking the pencil off the paper and without looking at the paper, but at our own reflection in a mirror.
Color exercise
After we studied color theory, we've been tasked with drawing one of our characters using charcoals.
This is an alternate concept I've had in mind for my child's dream game.

Toned drawings


Photographic and video examples of various shots
.jpg)
.jpg)
.jpg)
.jpg)
.jpg)
.jpg)
.jpg)
.jpg)
.jpg)


